 PODspy

To make a sticker sheet for print-on-demand, prepare each design as a separate asset and assemble the sheet in the format your printer accepts. The trick is to check what the printer will cut. Six illustrations on a canvas can become six peelable stickers, one big rectangle, or a sheet with two motifs joined together. Here’s how to plan a six-piece garden sheet and catch those problems before you list it.
The creative shortcut
- Check whether your printer wants separate images, a single layout, or a file with cut paths.
- Measure the gap between finished cut contours and keep the sheet background on a separate layer.
- Count the peelable pieces on the proof before you publish the listing.
Find out what your printer wants uploaded
Open the exact product and size you plan to sell. Check whether the editor asks you to place one image at a time, upload a completed sheet, or supply cut paths. Also check the maximum piece count, minimum piece size, spacing and whether the backing can be printed. These settings depend on the product, including products that use the same words in their names.
Gooten’s kiss-cut sticker instructions, for example, call for fully transparent space around the sticker shapes on a multi-design sheet. A solid color across the whole canvas would fill that space. Stickymade’s custom sheet instructions allow a printed backing when the artwork includes the right bleed, and describe how to send a full layout for a proof. Printify’s help page gives different minimums for a sticker sheet and for putting multiple designs on a single kiss-cut sticker product.
- Separate uploads: export one transparent PNG per motif if the editor accepts PNG. Place each file into its intended area and check the final count in the combined preview.
- Full-sheet upload: use the product template at its specified size. Keep the area between pieces transparent when the printer derives cuts from transparency. Use a printed background only when the product supports it.
- Supplied cut paths: keep the vector contours separate from the artwork and follow your printer’s file format, layer and spot color instructions.
Build the set one sticker at a time
For a garden planner sheet, start with a greenhouse as the anchor. Add a watering can, glove, pot, trowel and seed packet. Give them the same outline weight and color palette. View them at the planned print size. If the greenhouse window grid becomes a dark patch, simplify it before making the other five motifs.
Keep an editable master with each motif on its own layer. Remove background pixels and stray marks, then inspect the edges against both light and dark temporary backgrounds. Add a consistent white rim only if you intend it to peel with the sticker, and account for any border the supplier adds. Small detached marks, like drops beside a watering can, can create extra cut pieces or disappear depending on the editor.
Use the brief below to start the greenhouse motif in PODspy. It opens as editable text in Generate Image. Once you choose to generate, inspect the result and prepare the individual motif file before placing it in the printer’s template.
Create one flat sticker illustration of a small greenhouse for an illustrated garden planner collection. Use a chunky dark olive outline, apricot roof trim, slate blue windows and solid cream highlights. Simplify the window grid and keep the greenhouse compact with one connected outer silhouette. Leave generous blank space on a plain solid light gray backdrop for cleanup. No words, hands, extra objects, floating accents, drop shadow, product mockup, cut guides or sheet layout.
Lay out the sheet and measure between cut lines
Use the finished cut contour to measure the space between stickers. An artwork box can miss the rim the printer adds around it. Check the narrowest gap, including between diagonal neighbors. Also measure from each outside cut to the sheet edge and keep important artwork inside the safe area of its own cut.
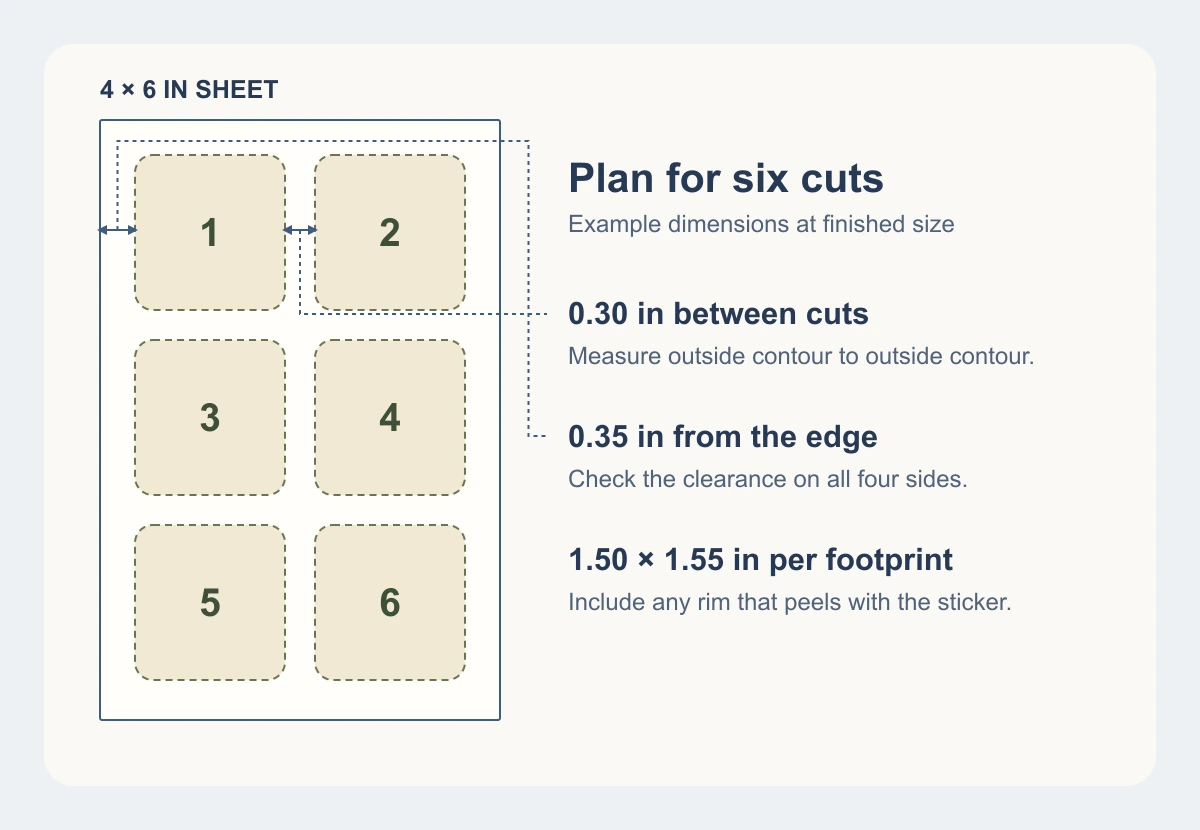
Here’s a planning example on a hypothetical 4 × 6-inch sheet. Put six finished contours in two columns and three rows. Allow up to 1.50 × 1.55 inches per contour, 0.30 inch between contours and at least 0.35 inch to the sheet edge. Width used is 0.35 + 1.50 + 0.30 + 1.50 + 0.35 = 4.00 inches. Height used is 0.35 + 1.55 + 0.30 + 1.55 + 0.30 + 1.55 + 0.35 = 5.95 inches. The layout fits on paper. Use the dimensions and cut preview of the actual product to decide whether it fits your printer’s rules.
If the preview joins two stickers, move them apart or shrink both cut footprints. If the layout still fails at a legible size, drop a motif or use a bigger sheet. If the printer asks for 300 pixels per inch, the finished 4 × 6 area is 1,200 × 1,800 pixels before any additional template bleed. At the motif level, a 1.5-inch-wide printed illustration needs 450 usable pixels across at that target. Ignore transparent padding when you count the pixels in the artwork.
Check the proof and list what the buyer will receive
Count the closed cut shapes on the preview or supplied proof. For the garden sheet, there should be six. Check for one contour around the entire artwork, joined neighbors, extra contours around specks and important lines that cross a cut. If the preview doesn’t show cut paths clearly, ask the printer how to confirm them before offering the sheet.
Save the editable master, the exact upload and the final proof together. For separate uploads, keep the motif files and a screenshot of their placement. Your listing should show the whole backing sheet and state the number of peelable pieces. Give the backing dimensions separately from an example sticker size so buyers can tell what fits their planner.


