 PODspy

Use the print area for your specific tote bag to size the design. A bag’s listed width and height describe the product. The area the printer can decorate may be smaller and may sit closer to the handles or seams than you expect. Here’s how to size and place a 6 × 9-inch front graphic, then adapt the same art direction for a tote that prints all the way to the seams.
The creative shortcut
- Read the print area for your exact bag, side and print provider.
- Size the visible artwork in inches, then check its actual pixel density and position on the bag.
- For all-over print, keep the subject in the safe area and carry the background through the bleed.
Read the print area for your exact tote
Choose the model, size, color, print provider and side you want to decorate. In its template or product editor, record the usable print width and height, the file dimensions, and the accepted file format. Check the back separately if you plan to decorate it. A maximum print box tells you where the artwork can go; choose the actual print size based on how you want it to look.
For example, PrintPapa’s DTG tote template calls for a centered 12 × 12-inch print area and an EPS file. Printify directs sellers to the Upload section in its Product Creator because the recommended dimensions can change by product and print area. Use whichever instructions apply to the bag you’re selling.
Size the visible artwork inside the front panel
Imagine a 10 × 12-inch front print box and a 2:3 sailboat illustration. A 6 × 9-inch print leaves two inches on either side when centered. It uses nine of the twelve available inches of height. If you leave one inch above the artwork, you’ll have two inches below it. That gives you room to try a slightly higher position without moving the art outside the print area.
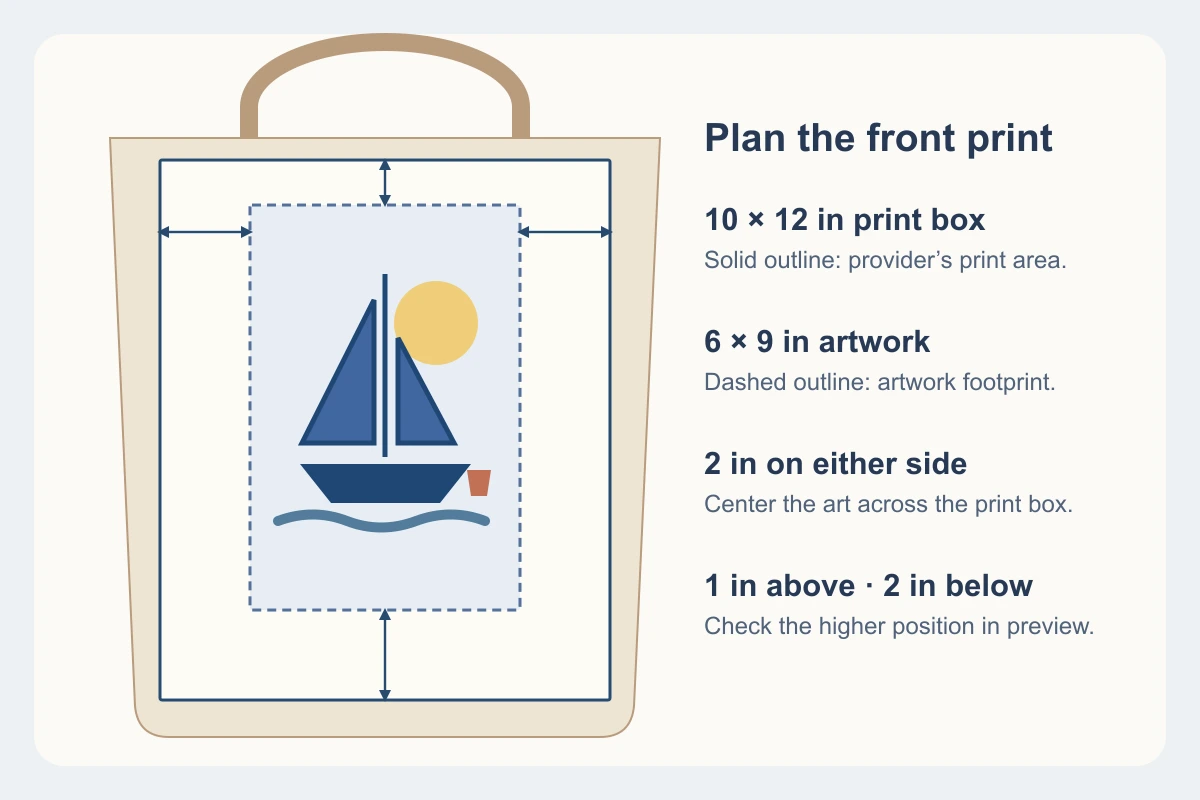
Measure the visible artwork, especially when the exported PNG has transparent padding. A file can report 3,000 pixels wide while the actual drawing occupies only 1,500 pixels. At a six-inch visible print width that drawing gives 250 pixels per inch. If the printer asks for 300 PPI, you need at least 1,800 × 2,700 usable pixels for the 6 × 9-inch art. A provider that asks for the entire 10 × 12-inch template at 300 PPI would get a 3,000 × 3,600-pixel canvas containing the smaller design at the intended scale.
If the editor positions the file by its outside edges, trim accidental transparent padding before uploading a standalone motif. When the supplier wants a full-template file, keep the canvas intact and position the artwork on its own layer. Hide template guides before you export unless the supplier explicitly asks you to retain them.
Check where the print sits when the bag hangs
Use the provider preview to check the gap under the handle stitching and above the bottom fold. View the bag from the front and at an angle if the editor offers both. The bottom of a gusseted bag changes shape when it fills, so a motif that looks centered on a flat template can read low in use. Move it in small steps within the printable area and compare the two positions at the same zoom.
If you have a comparable blank, print the artwork at actual size on paper and hold it against the bag. Add a book or something similar so the base opens, then hang the bag and look at the size from a few feet away. This can check scale and legibility. Use the supplier’s proof or a physical sample for the actual placement, ink and fabric appearance. On a dark bag, check the same design on that specific color before offering it.
Build a separate file for an all-over tote
Use the all-over template for the exact size. For example, Gooten lists its cut-and-sew tote in three sizes and supplies templates for the print and bleed areas. Keep the sailboat and any text in the visible safe area. Extend the water or a simple repeat through the bleed, including the part of the panel that may fold underneath. Use each panel the supplier provides, and check how the front, back and bottom meet in the preview.
If a straight horizon has to meet at a side seam, a small placement shift can make the join stand out. Keep the horizon inside one panel, or use waves or a scattered repeat near the join. Download the preview for each size you sell and confirm the front orientation, subject clearance and background coverage before you use it in a listing.
Start with a motif you can place and resize
The brief below opens as editable text in PODspy’s Generate Image workspace. After you choose to generate, check the resulting aspect ratio and the pixels occupied by the art. Clean the edges, save the artwork separately from the bag preview, and place it on the provider template. If the motif reads too small on the bag, try fewer details before making the whole print larger.
Create a portrait 2:3 spot graphic for a natural canvas tote: a small cobalt sailboat passing a single terracotta harbor buoy under a pale butter sun. Use a dark navy keyline, solid shapes and just two broad wave bands. Keep the silhouette compact and the main shapes readable at six inches wide. Use a plain light gray background for cleanup. Show only the flat artwork. No words, logos, fabric texture, bag mockup, guides, borders or shadows.


