 PODspy

A wrapping paper design has two jobs. The artwork needs to fill the printer’s template, and the pattern needs to read after someone cuts and folds it. Start with the face of a gift box your customer might wrap. Then choose the scale of the motifs and set up the file for the paper you plan to sell.
The creative shortcut
- Check how much of your motif stays visible on an actual gift face.
- Read the printer’s instructions for the repeat panel, full sheet or roll before exporting.
- Review every size you sell at the intended print scale.
Find out what the printer wants you to upload
Pick the paper and size before you lay out the design. Check whether the printer wants a small repeat tile, a panel it repeats along a roll, or artwork placed on a full sheet. Write down the print dimensions, trim, bleed and accepted file type. A roll’s listed length alone won’t tell you the upload size.
For a full sheet, StationeryHQ lists a 20 × 29-inch finished sheet and a 20.25 × 29.25-inch artwork file including bleed. Gooten gives a different kind of specification for its wrapping paper rolls. Its design guidance says the panel repeats every 42 inches and a faint line can appear there. Printify also offers a Pattern tool in Product Creator for repeating uploaded artwork. Read the directions for your specific item before deciding which file to build.
Compare motif sizes on the part of the gift you can see
For a small gift box with an 8 × 5-inch top, compare two versions using the same citrus illustration. On a two-inch grid, the visible face covers four repeat widths and two and a half repeat heights. On a four-inch grid, it covers just two repeat widths and one and a quarter repeat heights. The larger fruit looks bolder, but a fold can hide most of a motif. Smaller fruit gives you more chances to see a whole one on the top face.
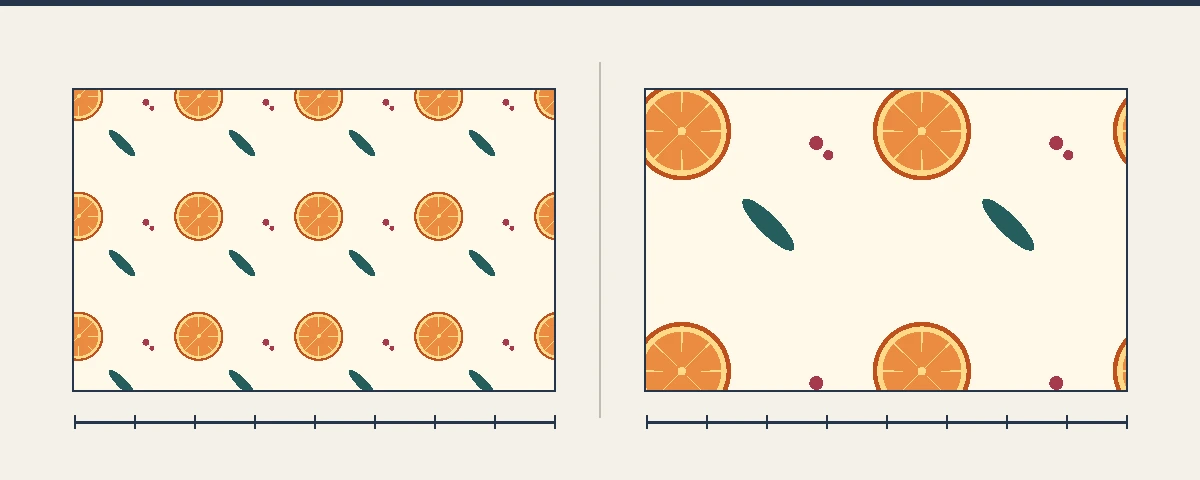
To test your design digitally, make an 8 × 5-inch window over the repeat at the intended print scale. Move it half a tile across and down. Check the narrow side of the gift too. If both positions leave you with fragments instead of a recognizable motif, try a smaller repeat or add a small secondary motif. Rotate a few motifs if the paper should look right from different sides. When a repeat contains a logo or a name, make sure cropping it won’t create a distracting fragment.
Try a plain-paper fit check on a sample box
For an 8 × 5 × 2-inch box, the paper has to travel around two five-inch faces and two two-inch sides. That adds up to 14 inches before overlap. Start with 15 inches around the box for this trial. In the other direction, try 14 inches to cover the eight-inch length with three inches of folding room at each end. These are working dimensions for this example. Cut a plain sheet and adjust the two allowances for your fold and the stiffness of the paper.
If you have only a desktop printer, print a representative section of your pattern at 100% scale. Verify a known measurement with a ruler. Lay it on the top face and curl it over an edge. Try a second position offset from the first. Look at the short side and box top from the angle you’d use for a listing photo. The exercise checks scale, orientation and fold placement. Ask your printer for a sample if you need to verify color, paper weight or a visible production join.
Build a motif set for both repeat sizes
The brief below opens as editable text in PODspy’s Generate Image workspace. Try a full citrus slice as your main shape and a small sprig as filler. Generate the motifs when you’re ready, then arrange them in a layout editor. Keep the same artwork while you compare scale so you can see what changing the repeat size does. If a motif crosses the edge of your tile, use the pattern guide to create its matching copy.
Create a flat editorial artwork sheet with four separate gift wrap motifs: a round orange citrus slice, a half citrus slice, one curved dark teal leaf sprig, and a pair of dusty raspberry berries. Use simple filled shapes and clear silhouettes, with warm orange, deep teal and muted raspberry on uniform pale ivory. Leave ample empty space around every motif so I can place them separately in a repeating layout. No letters, border, mockup, product, shadow or texture.
Export and review each paper size
If your printer repeats your tile, check its physical width in the editor before you confirm the preview. If the printer needs a full sheet, place multiple copies at the chosen size, extend the background through the required bleed and hide the guides before export. On a bigger sheet, add more repeats if you want the motifs to stay the same size. Fitting the whole layout to a different sheet can enlarge or stretch them.
For a roll made from multiple panels, inspect where one printed panel ends and the next begins. Keep important text and large shapes away from that boundary if the provider flags a visible join. Check your preview on every paper size in your listing and save separate exports named for the provider and size.


