 PODspy

Start a throw pillow design with the cover’s finished face. A square upload can include fabric that ends up in the seam, and a filled pillow curves away from the viewer near its edges. Give the front a focal graphic that can breathe, then make a coordinated reverse and check both sides on the provider’s template.
The creative shortcut
- Check the provider’s file dimensions, finished edge, and zipper orientation for each size.
- Measure the visible artwork on the face of the pillow and keep important detail away from the curve at the edges.
- Give the reverse a design that still works if the two sides shift at the seam.
Find the template for the cover you’ll sell
Choose the exact provider, product and size. Find the upload dimensions, file format, bleed and safe area in its template or editor. Check whether it wants a separate file for each side or one layout with marked panels. Identify the top and zipper side for each panel using the provider’s guides. A cover size in the catalog gives you a sense of scale. Use the editor or template for the file size.
For example, Printify lists a spun polyester pillow with two printed sides and a concealed zipper. The catalog notes that the insert is larger than the cover. Use the cover’s artwork template to position the art. Gooten also offers downloadable templates for its throw pillows and advises checking placement for each size even where its system resizes an uploaded image.
Set the motif size on the visible face
Suppose a teaching template has a 16 × 16-inch finished face and a 17 × 17-inch upload area. The extra half inch on each edge is reserved for this example’s bleed. The dashed guide in the illustration marks a 14 × 14-inch area for important detail. These dimensions illustrate the layout. Check your template for its actual boundaries.
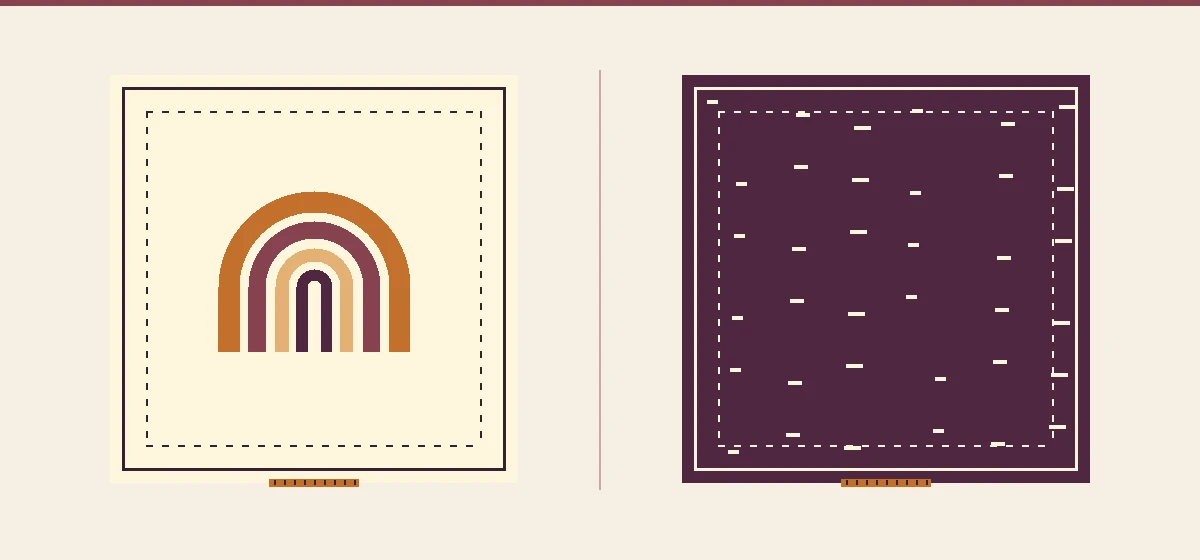
Start with an eight-inch-wide arch on the front. It takes up half of the 16-inch face and leaves four inches on either side when centered. At 300 pixels per inch, the visible arch needs 2,400 pixels across and the full 17-inch square needs 5,100 pixels across. These numbers describe different parts of the same file. Check the pixels in the visible graphic if the source has empty margins.
On an 18-inch cover, the same arch can stay eight inches wide or grow to nine inches to occupy the same share of the face. If you stretch a 2,400-pixel motif to nine inches, it has about 267 pixels per inch. If your provider needs 300 at that size, start with a sharper source or a vector version. On the preview, check the focal graphic on the filled pillow, especially when using a frame or text near the edges.
Give the reverse a design that can shift at the seam
Pull one color from the front into the reverse. An ochre arch with a small plum accent can pair with a plum back and scattered cream dashes. Extend the reverse background through the marked bleed. Keep a stripe, border or text away from the seam if a small placement shift would make it look broken. Gooten’s cut-and-sew guidance cautions that the front and back patterns won’t align perfectly.
On a working copy of the layout, add a temporary arrow pointing up and a short mark for the zipper edge. Check the layout for both sides against the template and flip between them in the preview if your editor supports it. This helps catch a rotated reverse before you export. If the printer supplies a single canvas with multiple panels, follow its orientation marks. Hide all your temporary marks and the template guides in the production export.
Create the focal artwork and pair it with the reverse
Open the brief below to start an editable prompt in PODspy’s Generate Image workspace. Once you choose to generate, pick a clear silhouette and check its visible size. Place the motif on its own layer over the front background. Use the same palette when you build the reverse, and compare how the two sides read at the intended print size.
Create one flat centered geometric artwork motif for a throw pillow cover, made of three nested rounded desert arch shapes. Use burnt ochre, dusty burgundy, pale sand and a compact deep plum accent. Keep the silhouette broad, balanced and clear at a small size. Use clean filled shapes with no thin strokes. Leave generous blank space around the motif on a uniform pale warm cream background. Show artwork only. No letters, border, fabric, pillow, mockup, shadows or guide marks.
Check each variant before preparing a listing
Inspect the front and back on each size. Look at the render from the front and from an angle if the editor offers both. Check the motif’s clearance from the seam, the orientation of the reverse and edge coverage. Save the front and reverse with the provider and size in each filename. If you switch to a front-only product, verify what the unprinted back will look like before you describe it in a listing.
Use a product sample to verify how the filled shape, fabric and seam look in person when those details matter to the listing. A preview helps you check position and orientation.


