 PODspy

A logo can look crisp on a screen and lose its smallest details when it is shrunk for a cap. Start with the finished width, measure the narrowest features, and simplify the artwork before sending it to your embroidery provider. This guide walks through a two-inch owl mark for standard flat embroidery.
The creative shortcut
- Measure the artwork at the size it will be stitched.
- Keep a dedicated small version with wider strokes and open spaces.
- Confirm the cap, placement, colors and size with the digitizer before approving the proof.
Choose the cap, stitch style and final width
Pick the exact cap, front placement and flat embroidery option before resizing. Use the embroidery area for that product and check where the cap’s front seam runs. Choose a finished artwork width within the supplier’s permitted area. Two inches is the width for the exercise below. Your cap may call for different proportions.
Find the provider’s guidance for strokes, text, colors and accepted files. Printify’s guide recommends lines at least 0.05 inch thick and gives separate guidance for lowercase and uppercase text. Apliiq recommends a half-inch letter height and lists a quarter inch as its acceptable minimum. Use the guidance attached to the product and embroidery option you will order.
Measure the logo after shrinking it
Duplicate the original and resize the visible artwork to the finished width in a layout editor. Going from three inches across to two multiplies every feature by two thirds. A 0.06-inch outline ends up 0.04 inch thick. A 0.30-inch tagline shrinks to 0.20 inch tall. In this example, the outline falls below Printify’s recommendation and the tagline falls below Apliiq’s acceptable minimum.
Measure the thinnest part of each stroke and the narrowest opening in a letter or shape. If you are working in pixels, use the width of the actual mark. For a 600-pixel-wide mark set to stitch at two inches, a 15-pixel stroke represents 0.05 inch. Transparent padding sits outside the visible mark and can throw that calculation off.
Keep the owl recognizable with fewer details
In the example, the tufted head, open eyes and ochre beak still identify the owl. Replace the thin head outline with a filled cream silhouette, remove the feather strokes and tagline, and open up the eyes. Ask the digitizer to check whether those openings can stay clear at the final size. If the name needs to stay, consider a separate wordmark in a supported larger placement.
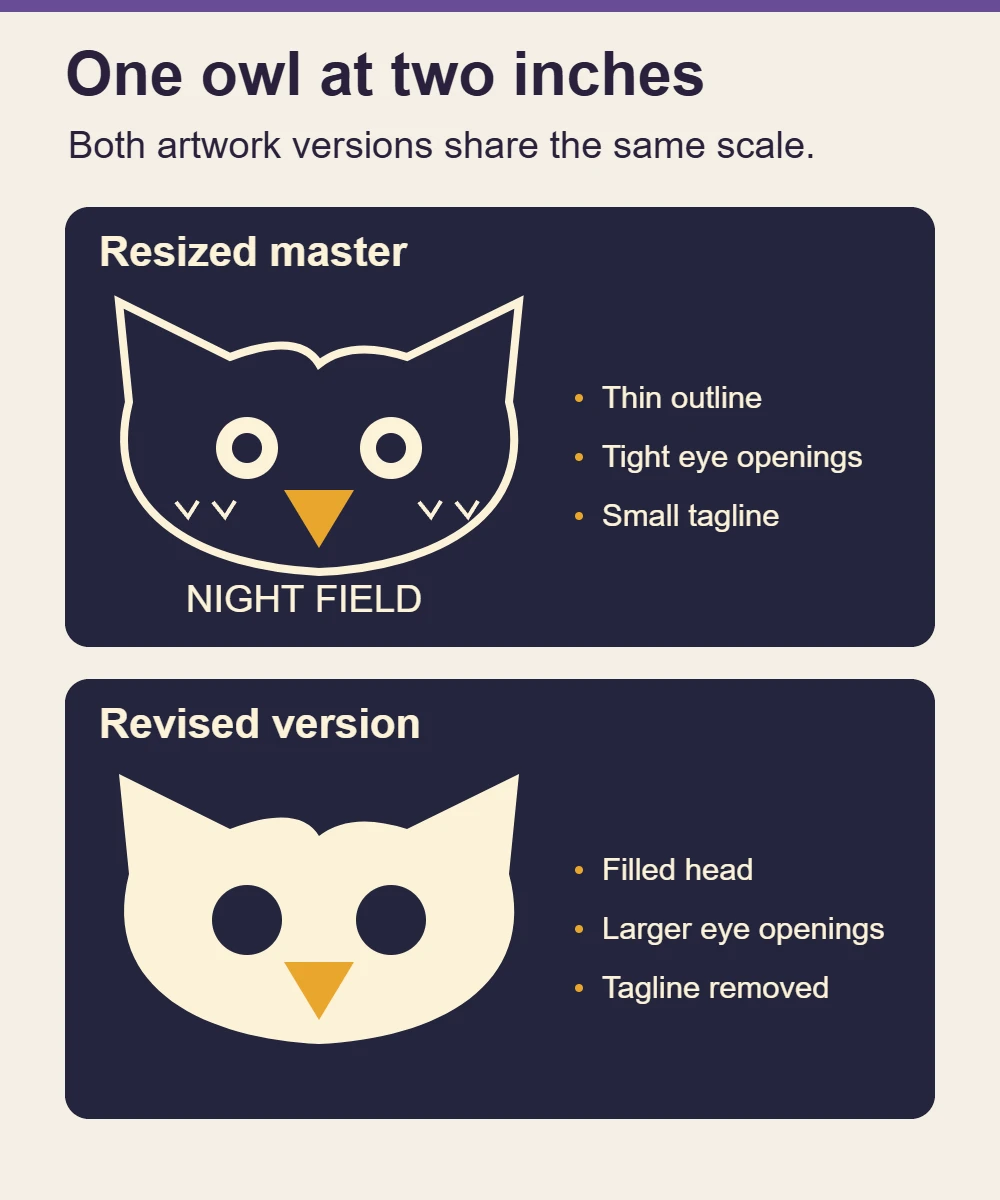
Use solid colors from the provider’s thread palette for the flat version. Check the mark against the actual cap color. Leave the eye openings transparent if you want the fabric to show through, and include that intention when you send the art.
Start with a flat motif in PODspy
Open the brief below in PODspy’s Generate Image workspace. You can edit the subject and colors before choosing to generate. Compare the resulting shapes at the intended physical size and adjust the artwork to meet the embroidery requirements in your layout editor before sending the design to the supplier.
Check that the space around the mark and inside its eyes is transparent if the supplier requires a transparent background. Keep a copy of the editable master and export the small version in a format your provider accepts.
Create a flat, compact owl head mark for the front of a baseball cap. Use one broad warm cream head silhouette with two short pointed ear tufts, two large circular open eye shapes, and one solid ochre triangular beak. Keep the outlines clean and the shape readable at a small size. Show the artwork centered on a plain midnight indigo background for contrast. No feather lines, lettering, border, gradients, shadows, stitch texture, hat mockup, or logos.
Tell the digitizer what needs to survive
Send the revised artwork with the exact cap, front placement, finished width and height, flat embroidery option and chosen thread colors. Point out the two open eyes and ask whether a cap seam or small gap changes the result. Confirm whether your supplier digitizes the file for you and which artwork formats it accepts.
Digitizing maps the artwork to stitches. If the supplier sends an approval sheet, compare it with the file you submitted. Look for closed eye openings, a changed beak or thread substitutions. Printful, for example, shows suggested adjustments in the order’s approval sheet when changes are needed. Confirm physical results with a sewn sample before making claims about a color or fine detail in your listing.


